This Zune 2 video converting guide is mainly about how to rip copy-protect DVD movie and convert limewire and YouTube video to WMV for the new Microsoft Zune 2 player. It also fit for Zune 1 player.
First, let me know the Zune2 compatible video and audio spec:
Video:
Windows Media Video (WMV) (.wmv) - Main and Simple Profile, CBR or VBR, up to 3.0 Mbps peak video bit rate; 720 pixels x 480 pixels up to 30 frames per second (or 720 pixels x 576 pixels up to 25 frames per second). Zune software will transcode HD WMV files at device sync
MPEG-4 (MP4/M4V) (.mp4) Part 2 video - Simple Profile up to 2.5 Mbps peak video bit rate; 720 pixels x 480 pixels up to 30 frames per second (or 720 pixels x 576 pixels up to 25 frames per second). Zune software will transcode HD MPEG-4 files at device sync
H.264 video - Baseline Profile up to 2.5 Mbps peak video bit rate; 720 pixels x 480 pixels up to 30 frames per second (or 720 pixels x 576 pixels up to 25 frames per second). Zune software will transcode HD H.264 files at device sync.
Audio:
MP3 (.mp3); Windows Media Audio Standard (WMA) (.wma); Advanced Audio Coding (AAC) (.mp4, .m4a, .m4b, .mov)
What we need is Aimersoft Zune Converter Suite, if you want to learn more about it, you can visit here: http://www.aimersoft.com/zune-converter-suite.html
Part1. How to rip DVD movie for Zune2
Step1. Download Aimersoft Zune Converter Suite and install it
Then click "DVD to Zune Converter" button to load the Aimersoft DVD to Zune Converter. You can learn more about it from here
http://www.aimersoft.com/dvd-to-zune-converter.html
Step2. Load DVD files
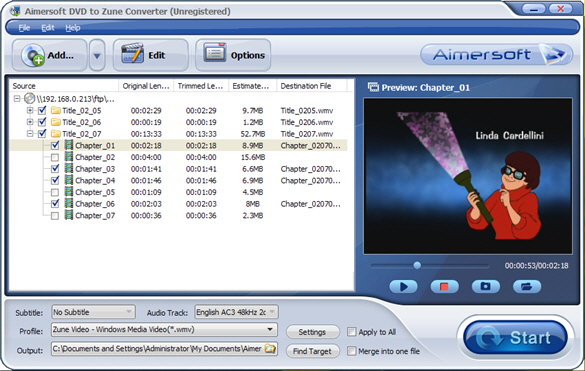
Insert your DVD disc into your DVD-Rom, then run the software, click "Load DVD" button and add the DVD file. You can also add DVD/IFO from your hard disk by clicking "Load File".

Step3. Select the chapters you want to convert.
You can convert your whole DVD by highlighting the title which contains the whole episodes of DVD, such as the title 01 in the following screenshot. Or if you like, you can select certain chapters to convert: Press the little button before “Check All†on the interface to find all the chapters in the file.
This software fully supports all kinds of DVD, such as regular DVD movie and DVD MTV. DVD MTV will have several titles, so you can select the desire MTV to convert.
Step4. Select the output Zune Video format, Subtitle and Audio
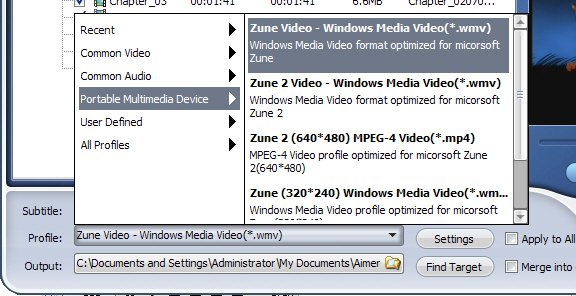
Format: This software can convert DVD to WMV and MP4 format which are fit for Zune2 and zune1 player, it also can extract audio track from DVD and save as MP3 and WMA format which are fit for any other MP3 player. If you care about video quality, you can select "Zune (640*480) Windows Media Video (WMV)" format, the quality is perfect, but it will take a little longer time to convert video.
Subtitle: Regular DVD movie usually has several subtitles, like English, French, German, etc. You can select anyone according to your need. You also can select "No Subtitle"
Audio: Select Audio is the same as select Subtitle.

Part2. How to convert AVI MPEG DivX XviD MOV YouTube and Limewire video to Zune2
If you want to learn how to download video music from limewire youtube, please refer to this step-by-step guide
Step1. Click "Zune Video Converter" to load Aimersoft Zune Video Converter. For more info about it, you can visit here
http://www.aimersoft.com/zune-video-converter.html
Step2. Load video files
Click the "Add" button to import your video. Aimersoft Zune Video Converter supports batch conversion, so you can import multiple files at a time. If you experience any problems adding videos by directly clicking the “Add†button, you can click "File -> Add DirectShow files…" to add the video files you want to convert from your computer.
Note: Limewire video usually is MPEG video, YouTube video is FLV video, and you can use Aimersoft Zune Video Converter to them to WMV video for Zune 2 player.
Step3. Select the output Zune Video format
Click the "Format" drop-down list to select the format you prefer for each added file. If you don’t know what formats your device supports, you can just select the format according to the device name.
If you want to customize the output quality, click the "Settings" button to open the Settings panel, where you customize resolution, frame rate, video bit rate, audio bit rate, sample, etc. You also can create a settings profile and save it, and then you won't have to do the same settings every time. Since Aimersoft Zune Video Converter supports batch conversion, you can use different profiles for each added video files to save your time. If you don't want to do these settings, the default settings will just work perfectly.
After all things done, click "Start" to start conversion.
Part3. How to transfer music and video to Zune 2 player?
You need Zune software to copy music and video to your Zune 2 player. You can download Zune software free from here: http://www.zune.net Install and run it.
1. In the Zune software, click Settings, Software, Collection.
2. Click Add Folder for the type of media you want to add. Find the folder you want Zune to monitor and click OK.
3. Plug in your Zune 2 player to Computer, then Zune software should detect your Zune 2 player. The first time you sync, Zune will add all your music, pictures, and podcasts to your device by default. Drag it from your collection to the device icon in the Zune software and sync starts immediately. When you decide what you want to sync, just drag it from your collection to the device icon in the Zune software and sync starts immediately.

First, let me know the Zune2 compatible video and audio spec:
Video:
Windows Media Video (WMV) (.wmv) - Main and Simple Profile, CBR or VBR, up to 3.0 Mbps peak video bit rate; 720 pixels x 480 pixels up to 30 frames per second (or 720 pixels x 576 pixels up to 25 frames per second). Zune software will transcode HD WMV files at device sync
MPEG-4 (MP4/M4V) (.mp4) Part 2 video - Simple Profile up to 2.5 Mbps peak video bit rate; 720 pixels x 480 pixels up to 30 frames per second (or 720 pixels x 576 pixels up to 25 frames per second). Zune software will transcode HD MPEG-4 files at device sync
H.264 video - Baseline Profile up to 2.5 Mbps peak video bit rate; 720 pixels x 480 pixels up to 30 frames per second (or 720 pixels x 576 pixels up to 25 frames per second). Zune software will transcode HD H.264 files at device sync.
Audio:
MP3 (.mp3); Windows Media Audio Standard (WMA) (.wma); Advanced Audio Coding (AAC) (.mp4, .m4a, .m4b, .mov)
What we need is Aimersoft Zune Converter Suite, if you want to learn more about it, you can visit here: http://www.aimersoft.com/zune-converter-suite.html
Part1. How to rip DVD movie for Zune2
Step1. Download Aimersoft Zune Converter Suite and install it
Then click "DVD to Zune Converter" button to load the Aimersoft DVD to Zune Converter. You can learn more about it from here
http://www.aimersoft.com/dvd-to-zune-converter.html
Step2. Load DVD files
Insert your DVD disc into your DVD-Rom, then run the software, click "Load DVD" button and add the DVD file. You can also add DVD/IFO from your hard disk by clicking "Load File".

Step3. Select the chapters you want to convert.
You can convert your whole DVD by highlighting the title which contains the whole episodes of DVD, such as the title 01 in the following screenshot. Or if you like, you can select certain chapters to convert: Press the little button before “Check All†on the interface to find all the chapters in the file.
This software fully supports all kinds of DVD, such as regular DVD movie and DVD MTV. DVD MTV will have several titles, so you can select the desire MTV to convert.
Step4. Select the output Zune Video format, Subtitle and Audio
Format: This software can convert DVD to WMV and MP4 format which are fit for Zune2 and zune1 player, it also can extract audio track from DVD and save as MP3 and WMA format which are fit for any other MP3 player. If you care about video quality, you can select "Zune (640*480) Windows Media Video (WMV)" format, the quality is perfect, but it will take a little longer time to convert video.
Subtitle: Regular DVD movie usually has several subtitles, like English, French, German, etc. You can select anyone according to your need. You also can select "No Subtitle"
Audio: Select Audio is the same as select Subtitle.

Part2. How to convert AVI MPEG DivX XviD MOV YouTube and Limewire video to Zune2
If you want to learn how to download video music from limewire youtube, please refer to this step-by-step guide
Step1. Click "Zune Video Converter" to load Aimersoft Zune Video Converter. For more info about it, you can visit here
http://www.aimersoft.com/zune-video-converter.html
Step2. Load video files
Click the "Add" button to import your video. Aimersoft Zune Video Converter supports batch conversion, so you can import multiple files at a time. If you experience any problems adding videos by directly clicking the “Add†button, you can click "File -> Add DirectShow files…" to add the video files you want to convert from your computer.
Note: Limewire video usually is MPEG video, YouTube video is FLV video, and you can use Aimersoft Zune Video Converter to them to WMV video for Zune 2 player.
Step3. Select the output Zune Video format
Click the "Format" drop-down list to select the format you prefer for each added file. If you don’t know what formats your device supports, you can just select the format according to the device name.
If you want to customize the output quality, click the "Settings" button to open the Settings panel, where you customize resolution, frame rate, video bit rate, audio bit rate, sample, etc. You also can create a settings profile and save it, and then you won't have to do the same settings every time. Since Aimersoft Zune Video Converter supports batch conversion, you can use different profiles for each added video files to save your time. If you don't want to do these settings, the default settings will just work perfectly.
After all things done, click "Start" to start conversion.
Part3. How to transfer music and video to Zune 2 player?
You need Zune software to copy music and video to your Zune 2 player. You can download Zune software free from here: http://www.zune.net Install and run it.
1. In the Zune software, click Settings, Software, Collection.
2. Click Add Folder for the type of media you want to add. Find the folder you want Zune to monitor and click OK.
3. Plug in your Zune 2 player to Computer, then Zune software should detect your Zune 2 player. The first time you sync, Zune will add all your music, pictures, and podcasts to your device by default. Drag it from your collection to the device icon in the Zune software and sync starts immediately. When you decide what you want to sync, just drag it from your collection to the device icon in the Zune software and sync starts immediately.

